


Mount your magnetic landing pad at the top of the bag, between the dividers, at the point where your hand naturally lands after a swing. Try a slip-over placement first; it engages the bag lip without adhesive and takes under a minute. If you want a permanent setup, move to an adhesive-backed plate once you confirm the spot works. The landing pad system is built around exactly this logic: a high-access zone and a docking point your hand finds without looking.
TL;DR:
- Magnetic landing pads should be placed at the top of the bag between the dividers, on a spot that the hand naturally lands after a swing.
- The slip-over lip method is ideal for testing placement, while adhesive bonding provides a more permanent mount after confirmation.
- Avoid placing pads directly over electronic or wireless devices, and do not mount them in hot environments or directly over pockets holding cards or fobs.
- Regular maintenance like weekly visual, tug, and retention checks can prevent the pad from loosening or dropping during a round.
- A purpose-built docking system with flexible magnets and dense spacing offers more reliable grip and conforming contact than generic rigid plates or simple magnets.
Table of Contents
- Best Zones for Magnetic Landing Pad Placement by Bag Type
- How Do You Install a Magnetic Landing Pad Correctly?
- Safety and Compatibility: Where Not to Place a Magnetic Pad
- Keeping a Magnetic Landing Pad Secure Over Time
- Why a Purpose-Built Docking System Beats a Generic Magnet
- Building the Habit That Makes Placement Actually Work
- Get a Landing Pad Built for the Placement You Just Learned
- Sources
Best Zones for Magnetic Landing Pad Placement by Bag Type
Placement is not a matter of personal taste. It’s a matter of geometry, and the geometry changes with the bag.
Carry and stand bags work best with the pad seated at the top, between the dividers, on the same side as your dominant hand. This spot sits above the club shafts, stays clear of your legs during the swing, and lands within a natural arm’s reach when you bend for a tee or reset your glove. It’s also the most structurally stable zone on a stand bag, since the divider top ring gives the pad a firm lip to grip.
Cart bags open up more real estate. The top collar still works, but a side-lip placement near the cart-strap channel often makes more sense if you’re riding and reaching from a seated angle rather than standing over the bag. Test both before committing.
Strap-adjacent placement suits walkers who want the towel or accessory within reach without bending to the bag at all. This zone trades a bit of long-term stability for speed. A pad mounted near a strap junction takes more vibration during the walk between shots than one seated flush against a divider ring.
Before you finalize any zone, run two checks:
- Reach test: stand in your normal setup posture and touch the spot without adjusting your stance.
- Security test: grab the bag by the strap and give it a firm shake. If the pad shifts or lifts, the zone or the mounting method needs work, not just tighter adhesive.
Accessibility and stability pull in opposite directions more often than you’d expect. The spot that’s fastest to reach is sometimes the one that takes the most vibration, so the right zone is usually a compromise, not a clear winner.
How Do You Install a Magnetic Landing Pad Correctly?
There are three practical installation routes, ranked from simplest to most permanent.
Method 1: Slip-over lip placement (no adhesive)
- Locate the top ring or divider lip where you want the pad to sit.
- Slide the pad’s edge over the lip until the magnets pull flush against the fabric or frame.
- Tug firmly in three directions (up, sideways, and toward the strap) to confirm it holds under normal bag handling.
This method is reversible and ideal for testing a zone before you decide on anything permanent.
Method 2: Adhesive-backed plate (permanent mount)
- Clean the mounting surface with isopropyl alcohol and a microfiber cloth to remove dirt, oils, and residue.
- If the surface is painted or coated in a non-matte finish, lightly abrade it. This step matters more than most people assume: adhesive bonds to the substrate underneath, not to a slick paint layer, and skipping it is the single biggest cause of early failure, according to manufacturer guidance on magnetic mounting kits.
- Press the adhesive plate firmly for a sufficient time, using masking tape to hold it in position while the bond sets if the surface is curved.
- Let it cure for at least an hour before loading any accessories onto the pad, per the same adhesive cure-time findings.
Method 3: Clip or loop integration (nonstandard bags)
Some bags have fabric too thin, too padded, or too irregular for either method above to hold reliably. In those cases, a sewn-in loop or a clip that anchors to an existing strap ring is a better fix than forcing adhesive onto a surface it won’t bond to.
Tools and supplies checklist:
- Isopropyl alcohol
- Microfiber cloth
- Light abrasive pad (fine grit)
- Masking tape
Final test checklist before your round:
- Engagement: does the pad seat fully and sit flush?
- Retention: does it hold a towel or accessory through a firm shake test?
- Movement: does it stay put after you walk with the bag over your shoulder for a few minutes?
Safety and Compatibility: Where Not to Place a Magnetic Pad
Strong magnets don’t play well with everything in your bag. Keep landing pads clear of NFC-enabled scorecards, key fobs, and any electronic device with a card slot or wireless charging function. The same caution that applies to wireless charging pads and foreign metal objects applies here: proximity to a strong magnet can interfere with signal processing or data on a card’s chip.
Heat is the other overlooked risk. Adhesive-mounted pads left in direct sun or a hot trunk for extended periods can soften the adhesive bond and, over time, weaken magnetic performance.
Do:
- Keep a buffer zone between the pad and any pocket holding cards, fobs, or electronics.
- Route rangefinder or phone-charging cables away from the mounting zone entirely.
Don’t:
- Mount a pad directly over a pocket that holds your phone or scorecard.
- Store the bag in a hot car trunk for days at a time if the pad is adhesive-mounted.
Pro Tip: Every few weeks, pull an accessory off the pad and check the pull force by hand. A noticeable drop in grip strength usually means the magnet has picked up debris or the adhesive has started to soften, not that the magnet itself is failing.
Keeping a Magnetic Landing Pad Secure Over Time
A five-minute weekly check catches most problems before they cause a dropped towel mid-round.
- Visual check: look for lifted edges, dirt buildup, or gaps between the pad and the bag surface.
- Tug test: pull the pad itself, not just an attached accessory, to confirm the mount still holds.
- Retention test: clip a towel or accessory on and give the bag a shake.
- Re-prep if needed: if adhesion has weakened, clean the surface again, re-abrade lightly, and reapply. Applying fresh adhesive over old residue rarely holds.
Drifting pads usually trace back to one of two causes: a curved surface that never had full contact, or a seam where two adhesive strips meet instead of one continuous bond. The same seam logic that governs gear pad setup in other outdoor sports applies directly to golf bags. Continuous contact beats patchwork every time.
For storage, keep the bag out of extreme heat and avoid stacking heavy gear directly on an adhesive-mounted pad for long stretches, since sustained pressure in one direction can slowly peel an edge.
Why a Purpose-Built Docking System Beats a Generic Magnet
Placement rules only work if the hardware itself is built to hold. This is where design details separate a reliable landing pad from a magnet that looks similar on a shelf.
Aiming Fluid’s landing pad uses a flexible internal sheet with tightly spaced magnets, the same design principle that lets professional-grade magnetic tool mats conform to curved fenders and doors instead of losing contact at the edges. A rigid plate loses grip the moment it hits a curved divider ring. A flexible mat keeps full magnet contact across the whole surface.
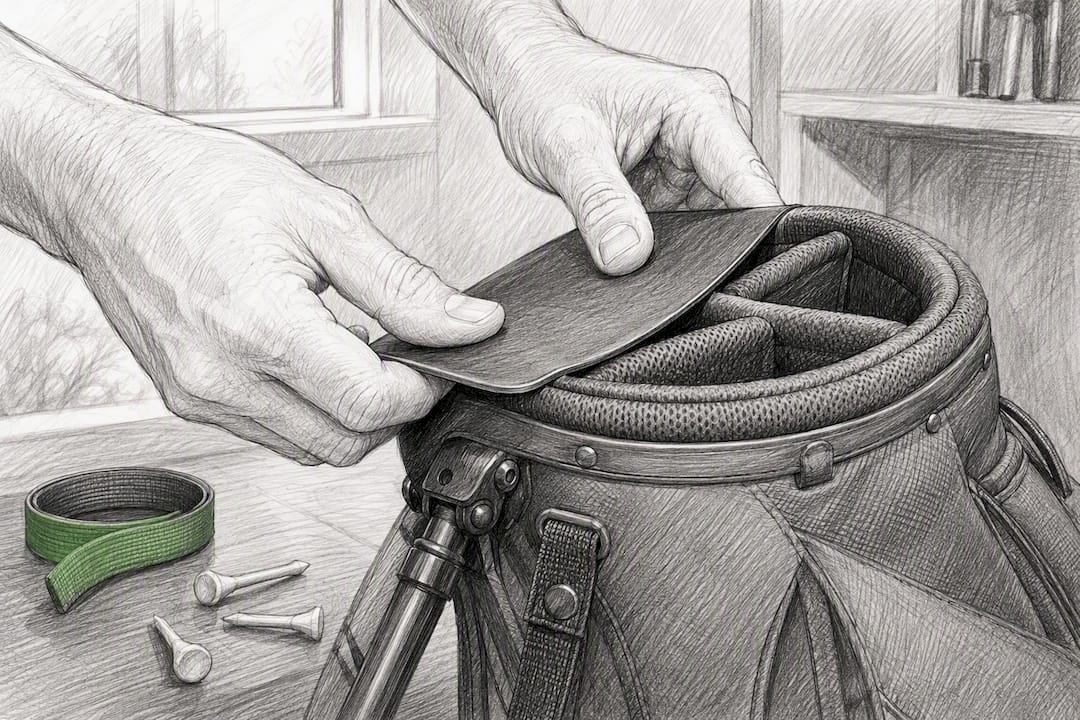
On a carry bag, that translates to a docking point that holds a towel through a full walking round without repositioning, even on the curved top collar most stand bags use. You can read more about how the magnet spacing and docking behavior work if you want the mechanical detail behind why placement and product design have to match.
Building the Habit That Makes Placement Actually Work
Placement only pays off if you use it the same way every time. Pick one docking point, return the towel to it after every shot, and check it before you tee off. Skip magnets near anything with a chip or screen, and skip curved, unstable spots until you’ve tested a slip-over fit. Start simple. Add adhesive once you know the zone earns it.
— Gary
Get a Landing Pad Built for the Placement You Just Learned
This magnetic towel and landing pad system is designed with dense magnet spacing, a flexible sheet that holds shape on curved bag collars, and a docking point intended to survive a full round of walking, reaching, and re-clipping.
The system pairs a durable magnetic towel with a landing pad engineered to hold its grip through vibration and repeated use, not just in a showroom test. If you want the full feature rundown before buying, the landing pad buyer’s guide breaks down sizing and mounting options by bag type. Ready to put one on your own bag? Check the large landing pad and towel set and pick the zone that matches your reach test.
Sources
- Magnetic alarm mounting kit product page — Safelincs
- Large magnetic tool pad product listing — Harbor Freight
- Crash pad set up — KinetiK Climbing


